

Image masking and Photoshop editing are powerful tools in graphic design. They help create stunning visuals and precise edits.
In today’s digital world, visual content is king. Whether you’re a professional photographer or a graphic designer, mastering image masking and Photoshop editing can elevate your work. Image masking allows for detailed and complex selections, making it easier to manipulate specific parts of an image.
Photoshop editing, on the other hand, offers a wide range of tools for enhancing and transforming photos. Together, these techniques can produce high-quality images that grab attention. Dive into the world of image masking and Photoshop editing to enhance your digital artistry.
Credit: helpx.adobe.com
Introduction To Image Masking
Image masking is a powerful technique in photo editing. It allows editors to isolate and manipulate specific parts of an image. This method helps create stunning visuals and precise edits. Whether you are a professional or a beginner, understanding image masking can enhance your skills.
What Is Image Masking?
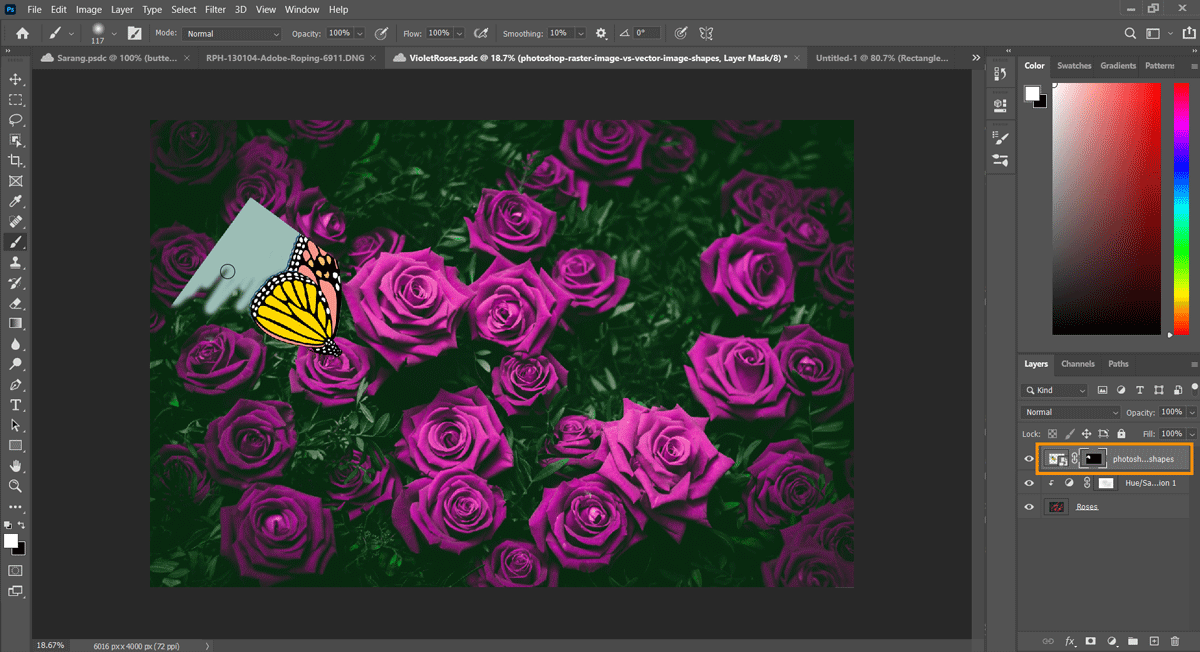
Image masking is a non-destructive way to hide or reveal parts of an image. It uses a mask layer to control the transparency of different areas. This process helps in making complex selections. It allows editors to work on intricate details without altering the original image.
Masks can be black, white, or shades of gray. Black hides parts of the image. White reveals them. Gray areas create partial transparency. This flexibility makes image masking a vital tool in Photoshop.
Importance In Photo Editing
Image masking is essential for precise photo editing. It helps in creating seamless composites. Editors can blend different images smoothly. This technique is crucial for background removal. It allows for clean and sharp edges.
Masking also aids in color correction. It lets you apply changes to specific parts without affecting the whole image. This control enhances the overall quality of the photo. In fashion photography, image masking is vital. It helps in isolating subjects from backgrounds. This makes the final image look professional.
Graphic designers use masking to add depth and dimension. It helps in creating dynamic and engaging visuals. In summary, image masking is a key skill in photo editing. It offers precision, flexibility, and creative control.
Types Of Image Masking
Image masking is a vital technique in Photoshop editing. It helps in creating seamless and professional images. There are different types of image masking methods. Each type has its own unique features and uses.
Layer Masking
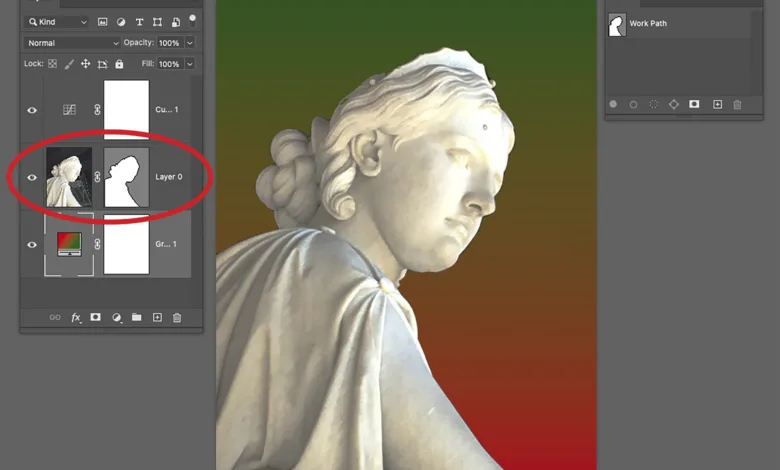
Layer masking is one of the most used techniques. It allows you to hide or reveal parts of a layer. You can use a brush to paint on the mask. Black hides the part, while white reveals it. This technique is non-destructive. It means you can make changes without altering the original image. Layer masking offers great control and precision.
Clipping Masking
Clipping masking is another popular method. It involves using one layer to define the visibility of another. The top layer acts as the mask. The content of the bottom layer is visible only through the top layer. This technique is perfect for adding textures to text or shapes. It is also useful for creating complex image compositions.
Alpha Channel Masking
Alpha channel masking is ideal for images with fine details. It is especially good for hair, fur, or semi-transparent objects. This method involves creating a mask based on the image’s alpha channel. The alpha channel holds the transparency data of the image. You can refine the mask using different tools and adjustments. Alpha channel masking provides high accuracy and detail.
Essential Tools For Masking
Image masking is a crucial technique in Photoshop editing. It allows users to isolate and manipulate parts of an image. To achieve accurate results, understanding the essential tools for masking is vital. Below are some of the most effective tools for this task.
Brush Tool
The Brush Tool offers precision when working on detailed areas. It allows users to paint directly on the mask. This tool is perfect for refining edges and adding fine details.
- Select the Brush Tool from the toolbar.
- Adjust the brush size and hardness as needed.
- Paint on the mask to reveal or hide parts of the image.
For more control, you can use a soft brush for smooth transitions. A hard brush works best for sharp edges.
Pen Tool
The Pen Tool is ideal for creating precise paths. These paths can be converted into selection areas. This tool is especially useful for masking objects with straight lines and curves.
- Select the Pen Tool from the toolbar.
- Click to create anchor points around the object.
- Close the path by connecting the last point to the first.
- Right-click the path and choose “Make Selection.”
The Pen Tool requires practice but offers unmatched accuracy.
Quick Selection Tool
The Quick Selection Tool is user-friendly and efficient. It automatically detects and selects the edges of an object. This tool works well for images with high contrast between the subject and background.
- Select the Quick Selection Tool from the toolbar.
- Click and drag over the area you want to select.
- Use the add or subtract options to refine the selection.
The Quick Selection Tool speeds up the masking process. It is perfect for beginners.
| Tool | Best For | Usage Tip |
|---|---|---|
| Brush Tool | Fine details and edges | Use soft brush for smooth edges |
| Pen Tool | Precise paths and selections | Practice for better accuracy |
| Quick Selection Tool | High contrast areas | Refine edges with add/subtract options |
Using these essential tools, you can improve your image masking skills. Each tool has its unique advantages. Choose the right one based on your specific needs and project requirements.
Step-by-step Masking Techniques
Mastering masking techniques in Photoshop opens up a world of creative possibilities. Whether you want to remove backgrounds or enhance specific parts of an image, these techniques are essential. Here, we will explore different methods of masking, including using layer masks, applying clipping masks, and utilizing alpha channels. Each technique has its own unique advantages and applications.
Using Layer Masks
Layer masks allow for non-destructive editing of images. This means you can hide or reveal parts of a layer without permanently altering the original image. Follow these steps to use layer masks effectively:
- Open your image in Photoshop and select the layer you want to mask.
- Click the Add Layer Mask button at the bottom of the Layers panel.
- Select the Brush Tool and set the foreground color to black.
- Paint over the areas you want to hide. Use white to reveal areas again.
Using layer masks is a flexible way to edit your images. You can always adjust the mask later.
Applying Clipping Masks
Clipping masks are useful for creating complex shapes and effects. They allow you to use the content of one layer to mask another layer. Here’s how to apply a clipping mask:
- Place the layer you want to use as the mask above the layer you want to be masked.
- Right-click on the top layer and select Create Clipping Mask.
- The bottom layer will now be masked by the shape of the top layer.
Clipping masks are great for text effects and intricate designs. They help keep your edits non-destructive and easy to modify.
Utilizing Alpha Channels
Alpha channels are advanced tools for masking. They store selections as grayscale images, which you can use to create complex masks. Follow these steps to utilize alpha channels:
- Make a selection in your image using any selection tool.
- Go to the Channels panel and click the Save Selection as Channel button.
- A new alpha channel will appear. You can edit it with painting tools or filters.
- Load the alpha channel as a selection by holding Ctrl (Windows) or Cmd (Mac) and clicking the channel thumbnail.
Alpha channels offer precise control over your masks. They are especially useful for detailed selections and complex compositions.
| Technique | Best For | Flexibility |
|---|---|---|
| Layer Masks | Non-destructive editing | High |
| Clipping Masks | Complex shapes and effects | Medium |
| Alpha Channels | Detailed selections | High |
Understanding these masking techniques will improve your Photoshop skills. Experiment with each method to see what works best for your projects. Happy editing!
Common Challenges And Solutions
Image masking and Photoshop editing can present a variety of challenges. These tasks require precision, especially with complex edges, fine details, and color spills. This section will explore common challenges and provide practical solutions.
Handling Complex Edges
Managing complex edges can be tricky. Hair, fur, and intricate patterns need special attention. Here are some solutions:
- Use the Refine Edge tool for smooth transitions.
- Adjust the Feather setting to soften edges.
- Utilize the Pen Tool for more control over difficult areas.
Dealing With Fine Details
Fine details, like strands of hair, require careful handling. Here are some tips:
- Zoom in to work on small areas.
- Use Layer Masks to hide unwanted parts.
- Apply the Smudge Tool to refine intricate details.
Fixing Color Spills
Color spills can ruin your image. They occur when background colors bleed into your subject. Follow these steps to fix them:
- Use the Clone Stamp Tool to cover unwanted colors.
- Apply the Hue/Saturation adjustment layer to correct color balance.
- Utilize the Brush Tool with the correct color to paint over spills.
Each of these solutions can help you handle common challenges in image masking and Photoshop editing. Practice and patience are key to mastering these techniques.
Advanced Masking Tips
Image masking is a powerful skill in Photoshop. Mastering advanced masking techniques can elevate your editing. This section focuses on advanced tips to refine your masking skills.
Refining Edges
Refining edges is crucial for a polished look. Use the Refine Edge tool to fine-tune selections. Adjust the radius to smooth out rough edges. Increasing the feathering softens the transition between the subject and background. Play with the contrast slider to enhance edge details. Refine Edge also helps in dealing with fine details like hair or fur.
Using Layer Styles
Layer styles add depth to your masked images. Apply drop shadows to create a sense of realism. Use inner and outer glows to make the subject stand out. Experiment with stroke and bevel effects for a unique touch. These styles can be adjusted easily, allowing for endless creativity. They can make your masked images look more professional.
Combining Multiple Masks
Combining multiple masks can tackle complex images. Create separate masks for different parts of the image. Use layer groups to organize these masks. Blend masks together for a seamless effect. This technique is useful for intricate compositions. It allows for greater control over each element. Combining masks can bring your edits to the next level.
Photoshop Editing Essentials
Photoshop editing is essential for anyone involved in digital media. It enhances images, corrects colors, and brings out the best in photos. For beginners and professionals alike, understanding the basics can make a big difference. Let’s dive into some Photoshop editing essentials.
Basic Adjustments
Start with basic adjustments to improve your photos. These include cropping, resizing, and straightening. Cropping removes unwanted parts of an image. Resizing ensures your image fits the desired dimensions. Straightening corrects any tilted horizons or lines. These simple steps can significantly enhance your photos.
Color Correction
Color correction is vital for making your images look professional. It involves adjusting the brightness, contrast, and saturation. Use the Brightness/Contrast tool to balance light and dark areas. The Saturation tool enhances or reduces color intensity. Accurate color correction makes your images vibrant and eye-catching.
Retouching Techniques
Retouching techniques improve the overall quality of your images. Use the Spot Healing Brush to remove blemishes or unwanted spots. The Clone Stamp tool helps duplicate parts of an image to cover imperfections. The Dodge and Burn tools lighten or darken areas for added depth. Mastering these techniques will give your photos a polished look.
Credit: graphics-pro.com
Creating Seamless Edits
Creating seamless edits is essential in professional image masking and Photoshop editing. It ensures the final image looks natural and cohesive. This section covers key techniques to achieve seamless edits. We’ll discuss blending techniques, matching colors and textures, and final touches and polishing. Each step is crucial for a flawless finish.
Blending Techniques
Blending is vital for seamless edits. Use soft brushes for smooth transitions. Adjust brush opacity to blend layers gently. Avoid harsh lines where different elements meet.
- Layer Masks: Use layer masks to hide or reveal parts of a layer. This helps in blending different elements smoothly.
- Feathering: Feather edges to create soft transitions. This reduces visible lines between layers.
- Gradient Tool: Use the gradient tool for subtle blending effects. It helps in merging different colors and textures seamlessly.
Matching Colors And Textures
Matching colors and textures is crucial for a natural look. Pay attention to lighting and shadows. Use adjustment layers to match colors.
- Color Balance: Adjust color balance to match the overall tone. Ensure all elements have consistent color tones.
- Texture Matching: Use texture overlays to match surfaces. This helps in creating a cohesive look.
- Lighting Adjustments: Adjust lighting to ensure uniformity. Matching shadows and highlights is essential.
Final Touches And Polishing
Final touches are necessary for a polished image. These steps ensure the image looks professional. Check for any inconsistencies or flaws.
- Sharpening: Sharpen the image to enhance details. Use the sharpening tool sparingly to avoid overdoing it.
- Noise Reduction: Reduce noise for a cleaner image. This is especially important for high-resolution images.
- Spot Healing: Use spot healing to remove any minor flaws. This ensures a perfect finish.
By following these steps, you can create seamless and professional edits. Each technique plays a crucial role in the final outcome.
Practical Applications
Image masking and Photoshop editing hold immense potential in various fields. These techniques transform ordinary images into stunning visuals. They are essential for many industries and professionals. Let’s explore some practical applications of image masking and Photoshop editing.
Product Photography
Product photography often needs a clean background. Image masking helps isolate the product from its background. This process ensures the product stands out. It also allows for a consistent look across product images. This is crucial for online stores and catalogs. Customers get a clear view of the product, free from distractions.
Portrait Retouching
Portrait retouching is another common application. Image masking can enhance facial features. It can also remove blemishes and imperfections. This creates flawless portraits. Photographers and clients prefer this for professional headshots and personal photos. The result is a polished and attractive image.
Creative Composites
Creative composites combine multiple images into one. Image masking makes this process seamless. It allows for precise control over each element. Artists can create surreal or fantasy scenes. This technique is popular in advertising and digital art. The final image tells a unique story, captivating the audience.

Credit: ezbackgrounds.com
Conclusion And Future Trends
Image masking and Photoshop editing will continue evolving with advancements in AI. Future trends may include more intuitive tools and automated features. This will enhance precision and save time for users.
The world of photo editing is constantly evolving. The techniques and tools we use today may change tomorrow. This makes it crucial to stay updated. Let’s explore the key points and emerging technologies in this field.
Recap Of Key Points
Image masking and Photoshop editing play vital roles in photo editing. These techniques help in removing backgrounds, enhancing details, and creating composite images. They are essential for photographers, designers, and digital artists. Mastering these skills can lead to more professional results. The tools in Photoshop make this process easier and more efficient.
Emerging Technologies In Photo Editing
New technologies are shaping the future of photo editing. Artificial intelligence (AI) is one of the most exciting developments. AI can automate many editing tasks. This includes background removal and image enhancement. Machine learning algorithms improve the accuracy of these edits. Augmented reality (AR) is another trend. AR can transform how we interact with photos. It adds a new layer of creativity and interactivity. Cloud-based editing tools are also gaining popularity. They allow for easy collaboration and access from anywhere. These tools can handle complex edits without the need for powerful hardware. In summary, staying informed about these trends is important. They can help you stay ahead in the field of photo editing. “`
Frequently Asked Questions
What Is Image Masking In Photoshop?
Image masking in Photoshop is a technique used to hide or reveal parts of an image. It allows for non-destructive editing, meaning the original image remains intact. This technique is essential for creating complex compositions and precise edits.
Why Is Image Masking Important?
Image masking is important because it provides precise control over which parts of an image are visible. It is essential for tasks like background removal, blending images, and applying selective adjustments. This technique is critical for professional-quality photo editing.
How Do You Create A Layer Mask?
To create a layer mask, select the layer you want to mask. Click the Add Layer Mask button at the bottom of the Layers panel. A white thumbnail appears next to your layer, representing the mask.
What Tools Are Used For Image Masking?
Common tools for image masking include the Brush Tool, Quick Selection Tool, and Pen Tool. These tools help you create and refine masks with precision. Using these tools effectively can significantly enhance your Photoshop editing skills.
Conclusion
Image masking and Photoshop editing enhance your photos’ quality. These techniques offer creative control. They help in achieving professional-looking images. Practice makes perfect, so keep experimenting. Always save your original files. This way, you can make changes later. Enjoy the process and see your skills grow.
Happy editing!